


Introduction
At Rootstrap, and IT staff augmentation company, my first assignment was to develop a React Native application, that involved maps, chat, and following the design specifications to the letter. While doing this, one of the first things I tried was to set the family font that the application uses, and I found out it wasn't as easy as I expected.
The biggest issue was that all the tutorials said to execute [.c-inline-code]react-native link[.c-inline-code], which in my experience was a bad idea because afterwards the application stopped building successfully. This occurs because since React Native 0.60 released, there is a property called Autolinking that changed how to link a library, as this post explains.
Overview
In this tutorial, you will learn how to add and link fonts manually, without using the link command.
First, you will see all the configurations that need to be done to use custom fonts and then you will learn its usage in a simple application.
Configuration
Create Project
First of all, you should create a project in react native. To do that, open the terminal and navigate to the folder you want to create your project in, and execute:
Install libraries
After creating the project, some libraries need to be installed:
Download and rename fonts
Since this is a tutorial about customizing fonts, you will need to have some fonts downloaded, in order to add them to your React Native project.
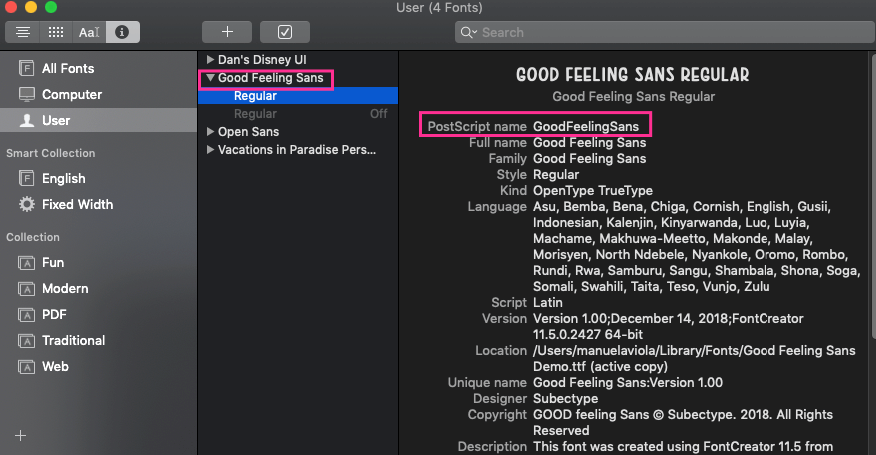
There are many places where you can get these customized fonts. For this tutorial, I used two different fonts, GoodFeelingSans and Dan'sDisney. In both cases, I ended up with a .ttf file.
In iOS, it is important for the font filename to be the same as its PostScript name. To find the PostScript name, open your [.c-inline-code]ttf[.c-inline-code] file with Font Book, see what its PostScript name is and rename the font to it.
Configurations in React Native
To use your custom fonts in a React Native project, each platform requires a different configuration, but there are also some general configurations all platforms need.
General
In both cases, you will need to create these folders in your project's root: src/assets/fonts. Inside the fonts folder, you should add you custom fonts .ttf files, one for every font you want to use.
Also, modify babel.config.js adding this code:
Android
In Android, you need to add this folders into android/app/src/main/ : assets/fonts. You should also a
dd your [.c-inline-code]ttf[.c-inline-code] files to the fonts folder.
iOS
In iOS, the configuration is a little more tricky. You need to go to ios/ folder and open the customize_fonts_react_native_tutorial.xcodeproj file with Xcode.
Afterwards, you need to press on customize_fonts_react_native_tutorial -> Build Phases and find the Copy Bundle Resources section.
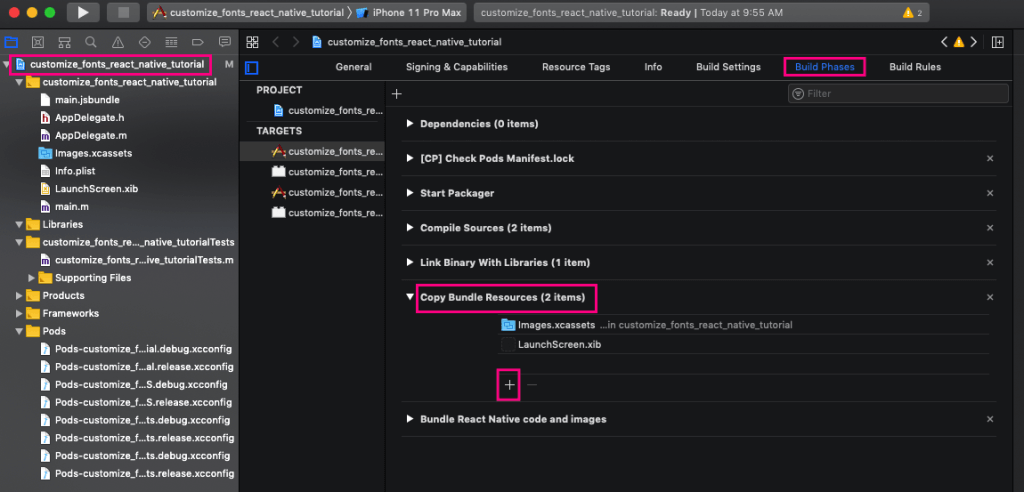
You should add your fonts by pressing the plus symbol, then Add Other... option, select your fonts from your src/assets/fonts folder and Finish.
Usage
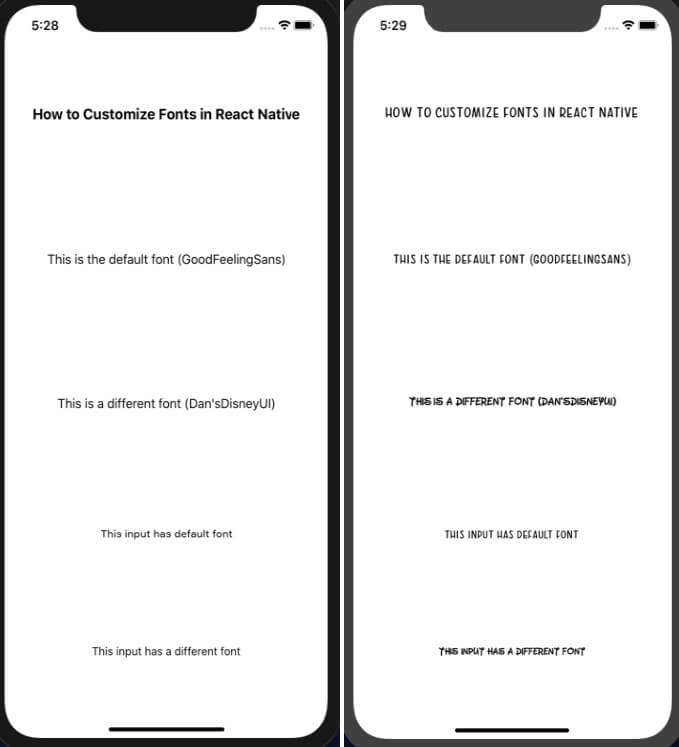
Finally, after all these steps you will be able to use customized fonts in your React Native project.
As an example, you can create a very simple screen, just to test everything is configured correctly. Add in src folder App.js and styles.js files.
App.js:
CODE: https://gist.github.com/ManuViola77/8ef19537877f00114dbaee49b1f44752.js
styles.js:
CODE: https://gist.github.com/ManuViola77/bde10a388c32f40011e7e475a327bd18.js
Also modify index.js to point to new ./src/App instead of ./App.
In this app, you are using the [.c-inline-code]react-native-global-props[.c-inline-code] library to set a custom font as default, in case you have an entire app with some default font. This is not necessary if you don't need it, you can just set the custom font only in the texts you want. Note how you can still do this even if you define a default custom font. Also note that there are two different default settings, one for the Text component and another for the TextInput.
Now, if you execute [.c-inline-code]react-native run-ios[.c-inline-code] or [.c-inline-code]react-native run-android[.c-inline-code] you should see the text with your custom fonts.
ENTER IMAGE HERE
iOS "Unrecognized font family" error
After following all these steps, if you are getting the very common Unrecognized font family error, there are still some things you can check or do.
First, you should check your info.plist file, located in the ios/customize_fonts_react_native_tutorial folder. This file must have a section with key UIAppFonts that contains an array of strings with your fonts. If this is missing, then you should add this:
If your project has multiple build targets, you should apply this change to their respective info.plist files.
After this, if you are still getting the error, you could try doing some (or all) of the things listed below:
- Uninstall app from simulator (or device)
- Delete node_modules folder, package-lock.json file and execute npm install
- In ios folder delete Pods folder, Podfile.lock file and execute pod install
- Reset cache by runnning npm start --reset-cache command
I hope after doing all this, you now have your new custom fonts working!
Summary
In this tutorial, you learned how to add, link and use custom fonts in React Native. You can find the GitHub project here.

.jpg)
