


One of the most unique and powerful features of SwiftUI is its data flow system. It uses concepts like state, binding, and observable objects to manage data and create reactive user interfaces.
In this article, we'll explore how SwiftUI's data flow system works and how to use it to manage data in your app and create reactive user interfaces.
Understanding State in SwiftUI
The state concept is at the heart of SwiftUI's data flow system. "State" is simply a piece of data that can change over time and is used to drive the behavior of your app's user interface.
In SwiftUI, you declare state using the @State property wrapper, like this:
CODE: https://gist.github.com/devs-rootstrap/42f5e72610502370926ed7d17cfe5e57.js?file=state.swift
The @State property wrapper can be applied to variables that are non-read-only (the main purpose is to make variables mutable), and SwiftUI should update the user interface whenever its value changes.
When you change the value of a state variable, SwiftUI automatically updates any views that depend on that variable.
Using Binding to Create Two-Way Data Binding
Another key concept in SwiftUI's data flow system is binding. A binding is a two-way connection between a piece of data and a view that displays or modifies that data.
When you create a binding, changes to the view are automatically reflected in the underlying data, and changes to the data are automatically reflected in the view.
In SwiftUI, you create a binding using the Binding type. Here's an example of how to create a binding to a state variable ($):
CODE: https://gist.github.com/devs-rootstrap/42f5e72610502370926ed7d17cfe5e57.js?file=binding.swift
In this example, we're creating a TextField that displays and modifies the value of our state variable named myState. The $ prefix on myState creates a binding to the underlying state variable, so changes to the TextField are automatically reflected in the myState variable.
Note: You cannot bind a UI control to more than one piece of data. This forces us to have our data as a 'Single source of truth' for our UI.
When using subviews, you can pass your @State into subviews that have a type of @Binding. This way, your subviews can observe changes or updates made to the @State.
Observable Objects
In addition to state and binding, SwiftUI provides a way to observe changes to more complex pieces of data using observable objects.
An observable object is a class that conforms to the ObservableObject protocol and uses the @Published property wrapper to signal changes to its properties.
Observable objects are particularly useful when you need to share data between views, such as when you have a master-detail interface with a list of items and a detail view displaying information about the selected item.
In this scenario, you can create an observable object that holds the list of items and the currently selected item and then pass that object down to the detail view.
Here's an example of how to create and use an observable object:
CODE: https://gist.github.com/devs-rootstrap/42f5e72610502370926ed7d17cfe5e57.js?file=observable-object.swift
We use ObservableObjects when you want to use a class as your data model or when our class has properties that you want to bind to the UI.
To bind an ObservableObject class to the UI, you should assign the observable object a property using the @StateObject property wrapper, as is shown in the previous example.
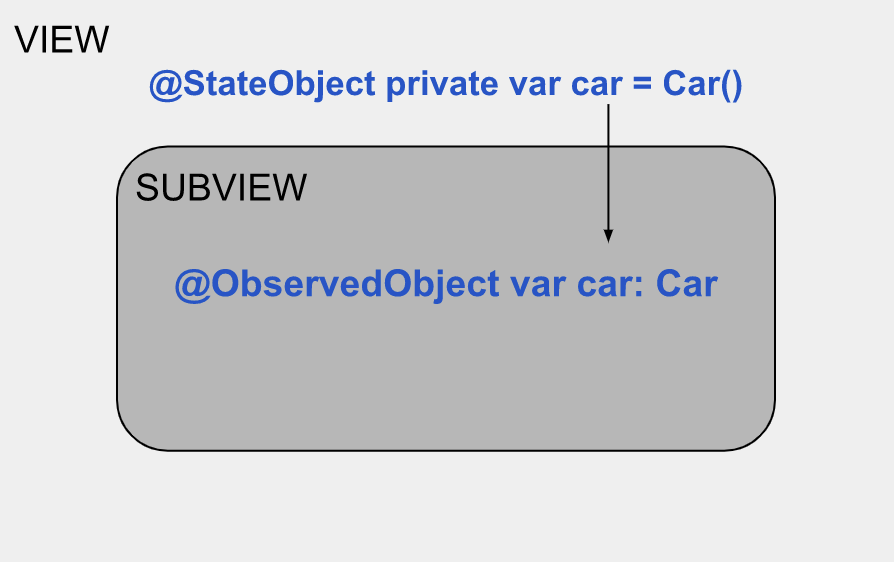
State Object & Observed Object
@StateObject is a property wrapper that allows you to declare an object that a particular view should own. This means that the object will be created when the view is created and destroyed when the view is destroyed. Any changes to the object will automatically update the view, just like with the @State property wrapper.
The @StateObject property wrapper is particularly useful when you have an object that needs to be shared between multiple views. Still, you don't want to make it a global variable or pass it down through the view hierarchy using SwiftUI's environment system.
If you implement subviews, you can pass your @StateObject into subviews with the type @ObservedObject. This will let your subviews get notified and updated about the changes/updates made in your @StateObject.
Note: @ObservedObject won't persist your data if your view is recreated/refreshed. You should never instantiate and assign an ObservableObject into an @ObservedObject.
EnvironmentObject
@EnvironmentObject is a property wrapper that allows you to pass an object down the view hierarchy using the environment system.
The environment system in SwiftUI is a way to provide global values that any view can access in the hierarchy without having to pass the values down through the view hierarchy manually.
To use @EnvironmentObject, you first need to create an object that conforms to the ObservableObject protocol and then inject that object into the environment of a parent view. Here's an example:
CODE: https://gist.github.com/devs-rootstrap/42f5e72610502370926ed7d17cfe5e57.js?file=enviroment-object.swift
In this example, we create a UserData object conforming to the ObservableObject protocol. We inject this object into the environment of the parent view ContentView using the @EnvironmentObject property wrapper.
We also access the userData object in a child view ChildView using the same @EnvironmentObject property wrapper.
By using @EnvironmentObject, we can access the UserData object from any view in the hierarchy without manually passing it down through the view hierarchy. This makes it easy to share data between views and keep the views in sync with the latest data.
Note that to use @EnvironmentObject, you need to create the object outside of the view hierarchy and inject it into the environment of a parent view using the environmentObject(_:) modifier.
AppStorage
@AppStorage is a property wrapper to easily read and write data to the user's device using UserDefaults. UserDefaults is a simple key-value store provided by Apple that allows you to store small amounts of data on the user's device, such as user preferences or settings.
Using @AppStorage, you can easily store and retrieve values from UserDefaults without having to work manually with UserDefaults' API.
Here's an example:
CODE: https://gist.github.com/devs-rootstrap/42f5e72610502370926ed7d17cfe5e57.js?file=app-storage.swift
In this example, we use @AppStorage to store and retrieve the username. The @AppStorage("username") property wrapper specifies that we want to store the value with the key "username" in UserDefaults. We're also providing a default value of "guest" if there is no stored value.
In the view's body, we display a welcome message that includes the user's current username, retrieved from UserDefaults using the @AppStorage property wrapper.
We're also displaying a TextField that allows users to update their username, automatically updating the stored value in UserDefaults.
@AppStorage is a convenient and easy-to-use way to persist small amounts of data on the user's device in SwiftUI without manually working with UserDefaults' API.
The Takeaway
In conclusion, SwiftUI's data flow system is a powerful tool for managing data and creating reactive user interfaces in your app.
By using State, Binding, ObservableObjects, StateObjects, ObservedObjects, AppStorage & EnvironmentObject, you can create user interfaces that automatically update as data changes without having to worry about manually updating views.
Whether building a simple or complex app with multiple views and shared data, SwiftUI's data flow system provides the tools you need to create responsive and dynamic user interfaces.


