
This is a React-specific guide on how to make the site you are developing secure.You might want to do this for several reasons. First and foremost: improved security. But, you may also be integrating a third party service that requires it or may be trying to improve your Google ranking.In my case, I had to implement Facebook authentication to get user pages, and Facebook requires being called from a secure site.
What is HTTPS?
Hyper Text Transfer Protocol Secure (HTTPS) is the secure version of HTTP, the protocol over which data is sent between your browser and the website that you are connected to. Basically, it encrypts the information being sent, making it extremely useful for sites that handle sensitive user data. Nowadays, as HTTPS has become more accessible to implement, secure connections are becoming the standard for all websites.
How do you set this up in your ReactJS project?
This tutorial assumes that you already have your bucket in S3 setup. In case you haven't, here is a tutorial you can follow.
Creating a CloudFront distribution
S3 is great for hosting your ReactJS project. Unfortunately, it does not provide you with HTTPS capabilities out-of-the-box. For this, you will need to use another service inside the AWS Console called CloudFront.What is CloudFront?Amazon CloudFront is a CDN (Content Delivery Network), a web service that speeds up distribution of your static and dynamic web content such as .html, .css, .js, and image files. In our case, we are just using it for the benefit of having a secure option.
Filling out the setup form
Select CloudFront from the services menu. Then, click on create distribution as this is CloudFront's equivalent to S3 buckets. Next, select get started under web section.
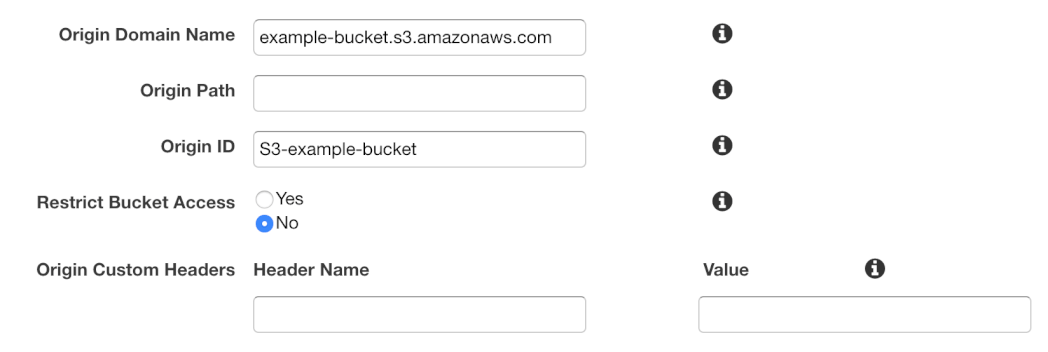
- Origin Settings
- Select Origin Domain Name and choose the bucket you want to create a distribution for. This will also populate Origin ID.
- Default Cache Behavior Settings
- The only field you should change here is Viewer Protocol Policy to Redirect HTTP to HTTPS. This will ensure that everyone that visits your site does it via HTTPS.

- Distribution Settings
- You should probably leave SSL Certificate with the default value, especially if you are in dev or staging. Once you go into production, you might need to use a custom certificate.
- Set Default Root Object to index.html. This ensures that when someone opens your page on root domain, it loads the site.
Finally, create the distribution!
Error pages configuration
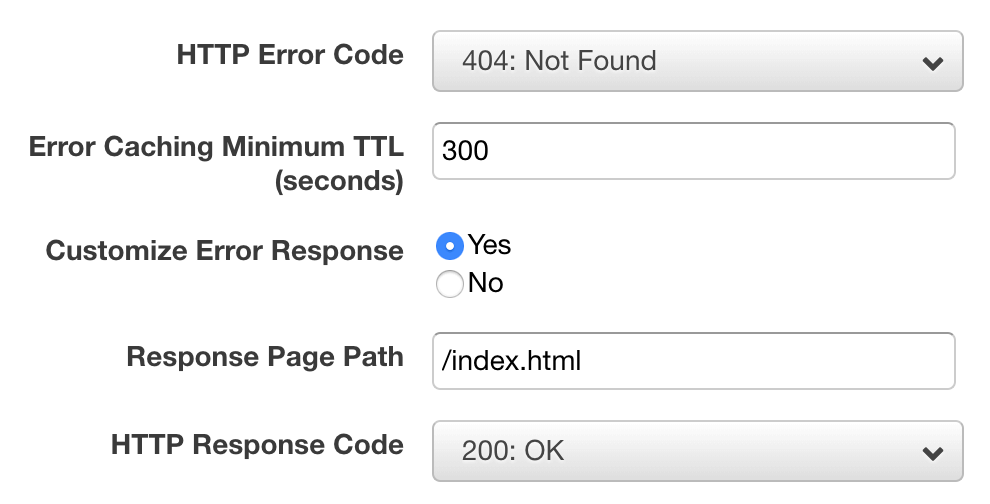
This is a critical step in ReactJS. As you may already know, your whole react project is compiled into a few files. There is really only one HTML page that is visited, and that's index.html.So, what happens when you enter a URL that is not the index?The server returns a 404 error. You’ll need to serve the index.html when this happens so users have a seamless experience.Enter the distribution you just created and go to the Error Pages tab. Click on Create Custom Error Response and fill it in like this:
Invalidations
This is an important new step that you will have to add to your deploy process. As said before, CloudFront is a CDN (Content Delivery Network). How does this affect you? Well, CloudFront basically runs on cached data that is renewed every 24 hrs. That is a really long time to wait to see your changes in the cloud. What can you do to see the new version right away? You can create something called an "invalidation." This step refreshes the cached data on the distribution.To create an invalidation go to the distribution associated with the bucket and click on the invalidations tab. From there, click on "Create invalidation."


