


What is VisionPro?
Apple announced a big piece of technological transformation in the WWDC23, which they called AR/VR headset that pushes the boundaries of what's possible. VisionPro boasts remarkable capabilities like spatial audio, gesture recognition, and eye tracking. What sets it apart from other VR headsets, such as the Oculus, is its seamless integration of user interface (UI) elements into the real world. Users can have virtual windows and elements coexisting with their physical environment, giving rise to a truly augmented reality.
Why Now?
Software companies must stay at the edge of new technologies and trends in the industry, prepare, and translate those into opportunities to stay competitive. This is why a team of our engineers dedicated the last weeks to exploring this new world's intricacies.
Before jumping into the technical aspects, let's talk about product and business details that might be worth considering if you are planning to develop for VisionPro.
Key features of VisionPro and VisionOS
- Spatial Computing: VisionPro allows developers to create windows, volumes, and spaces, which can be shared or dedicated. This means apps can place virtual content in the real world or immerse users in entirely digital environments. We will dive deeper into these concepts later in this article.
- SwiftUI and RealityKit: The platform leverages SwiftUI and RealityKit to build immersive experiences across windows, volumes, and spaces, with support for rendering 3D content.
- ARKit Integration: VisionOS uses ARKit algorithms to handle features like world mapping, object detection, and environment lighting, ensuring that apps benefit from ARKit's capabilities.
- Eye and Hand Gesture Tracking: VisionPro's advanced tracking systems provide intuitive and natural ways for users to interact with apps, from controlling SwiftUI elements to engaging with 3D content.
- Audio Design: VisionOS offers a multi-channel audio system with spatial, ambient, and channel sources, enabling developers to create rich immersive audio experiences.
- Unity Integration: Developers can use Unity's tools to create new apps and games for VisionOS, combining the benefits of VisionOS with Unity's features like AR Foundation.
Pricing and Target audience
While the developer framework itself is free to use, there are a few costs to consider before developing apps for VisionPro:
The Apple Developer Account Membership is $100 per year. This one is not directly related to VisionPro app development, but it is something to have in mind if you want your apps to be published on the AppStore.
The VisionPro was announced starting at $3,499 with 256Gb storage, it will vary depending on your country. It will be available in US stores on February 2nd, so we will know more by then.
Validating before executing is important. Before jumping into Xcode, ask yourself if the target audience of your new app idea really are VisionPro users, or if your existing apps benefit from a VisionPro version.
What do we need for VisionPro app development?
Here is the full list of hardware and software requirements so you can jump right into the coding.
- A Mac(with Apple silicon) running macOS Ventura 13.5 or later
- Xcode 15.1 or later. Make sure it comes with visionOS SDK. At the time of writing, only the beta versions of Xcode 15 come with it.
- VisionOS 1.0 runtime and simulator
- Reality Composer Pro 1.0
- This program is not strictly necessary, but it is a game changer for devs with little or no experience with 3D environments.
How we built our first VisionPro app
Let's do a full review of the Matrix-themed app we built. We chose this topic mostly because it makes a lot of sense to experience different presentation modes, and also, there are lots of awesome and free 3D assets available on the Internet.
This demo app aims to try out most of these new fantastic features and tools that Apple promised for developers. We will be playing with:
- Mixed SwiftUI views and RealityKit 3D content
- Attaching SwiftUI views to 3D content
- Different spatial audio channels
- Fully Immersive environments
- Creating scenes in Reality Composer Pro
Watch out for this compilation error!
I, and other fellow devs, faced the following error while compiling the application code:
[iOS] unknown: Encountered an unknown error (unexpected token at 'objc[13072]: Class XROS1_0SimRuntime is implemented in both /Library/Developer/CoreSimulator/Volumes/xrOS_21N5207f/../xrOS 1.0.simruntime/../xrOS 1.0 and /Library/Developer/CoreSimulator/Volumes/xrOS_21N5165g/../xrOS 1.0.simruntime/../xrOS 1.0 One of the two will be used. Which one is undefined.
This is caused by multiple visionOS runtimes being installed and available to the running Xcode application, possibly by updating to a newer SDK version from an Xcode upgrade.
If you bump into this, the solution is simple:
- Open Xcode 15
- Go to Settings -> Platforms.
- At the bottom, you will find more than one entry for xrOS runtime, the older ones will be marked as such.
- Delete the older xrOS runtimes.
Create a new VisionPro app
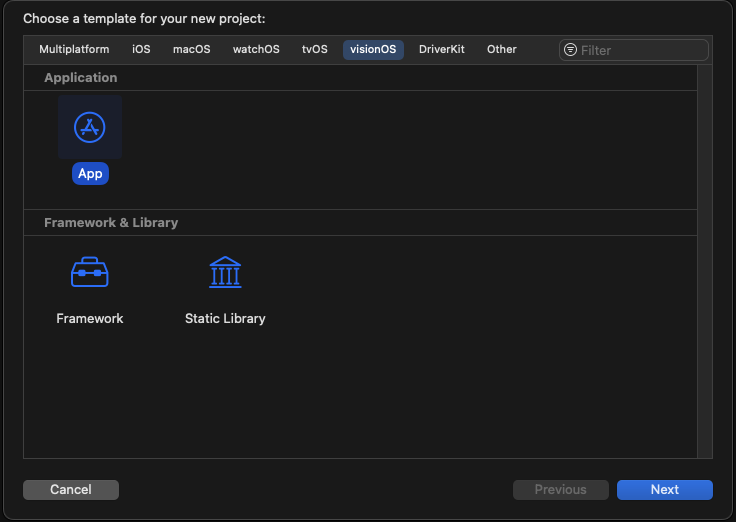
1. You can simply go and create a new project in Xcode(Cmd+Shift+N) and select the visionOS platform as in the picture below.
2. Then fill in the details of the new app, in this case, we will go with:
- A Window as the Initial Scene (can be changed later)
- RealityKit 3D rendering
- A Mixed Immersive Space mode (can be changed later)

3. Finally, hit Next and you will have your first VisionPro application.
You will see a new ContentView that is created by default, and in the Xcode canvas, the preview of a classic Hello World application. We will change that in a minute, but before let's go through the details of our Matrix app.
The general idea of our app is to have 3 stages showcasing the different presentation modes and other features in each of them. First, we would land into a normal Window, that gives the user the ability to enter a mixed reality. This mixed reality will be a Volume, where we will present a 3D scene simulating the famous choice that Neo was given: Taking the blue or the red pill.
The selection of the pills will trigger some navigation, in the case of the blue pill, and following the Matrix principles, the user will be taken back and nothing else happens. However, if they choose the red pill, they will enter a fully Immersive Space, where more magic happens. 🪄
Show me the code
First Stage: App launch and WelcomeView
Let's start with the first Stage, a classic Window that is presented when the app is launched. This is pretty straightforward since we already selected this option in the project configuration.
Update `TheMatrixApp` struct with the following code:
CODE: https://gist.github.com/devs-rootstrap/07d1a15ee546ddadc1eeb662e8e4f52b.js?file=TheMatrixApp.swift
We set the WelcomeView as the initial screen in our WindowGroup. The important thing to notice here is that the order you use to define Windows is the one used when the app runs.
Also, we added our first ImmersiveSpace that displays all content in the real environment and the user will be able to see the room normally. This is critical for displaying the pills to the user as if they were in the real world. This is achieved with the immersionStyle view modifier, which can be configured with mixed, full, or automatic styles.
At this point, the WelcomeView and PillsScreen views are empty.
For the WelcomeView we want to display a looping video with the classic falling symbols from the Matrix movie, and a simple button that navigates to the next stage, our mixed ImmersiveSpace.
CODE: https://gist.github.com/devs-rootstrap/7c281a29bd0a69b3ca2b348fa0d22fb8.js?file=WelcomeView.swift
This is what is happening in this view step by step:
- We declare the dismissImmersiveSpace and openImmersiveSpace environment functions. As the name implies, these will allow us to open and dismiss a specific ImmersiveSpace later in this view.
- We create an AVPlayer object that will play a static video resource we added to the app Bundle.
- We use a custom AVPlayerView that implements UIViewControllerRepresentable to host an AVPlayerViewController holding the AVPlayer we created before.
- We use a ZStack to put the AVPlayerView at the back and a simple Button in the front. This button will asynchronously run the openImmersiveSpace when tapped, taking the user to Stage 2, the pill selection screen.
That is the most important functionality of this view, the rest are helper functions to control the infinite looping video.
If you run the app, this is how it should look in the VisionPro simulator:
.png)
Cool, let's go ahead and implement the PillsScreen so the button doesn't take the user to an empty ImmersiveSpace anymore.
Now, this is the first time we will need 3D assets to add to our RealityKit views, specifically the red and blue pills that the user can see and take.
It is a good idea to take a look at the basics of Reality Composer Pro and how to build a scene to load in our code.
Reality Composer Pro
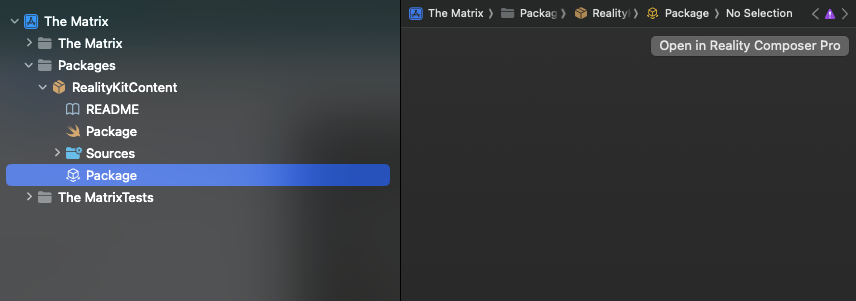
In Xcode, select the Package file from the RealityKitContent bundle. This will open a new tab with the option to Open it with Reality Composer Pro.
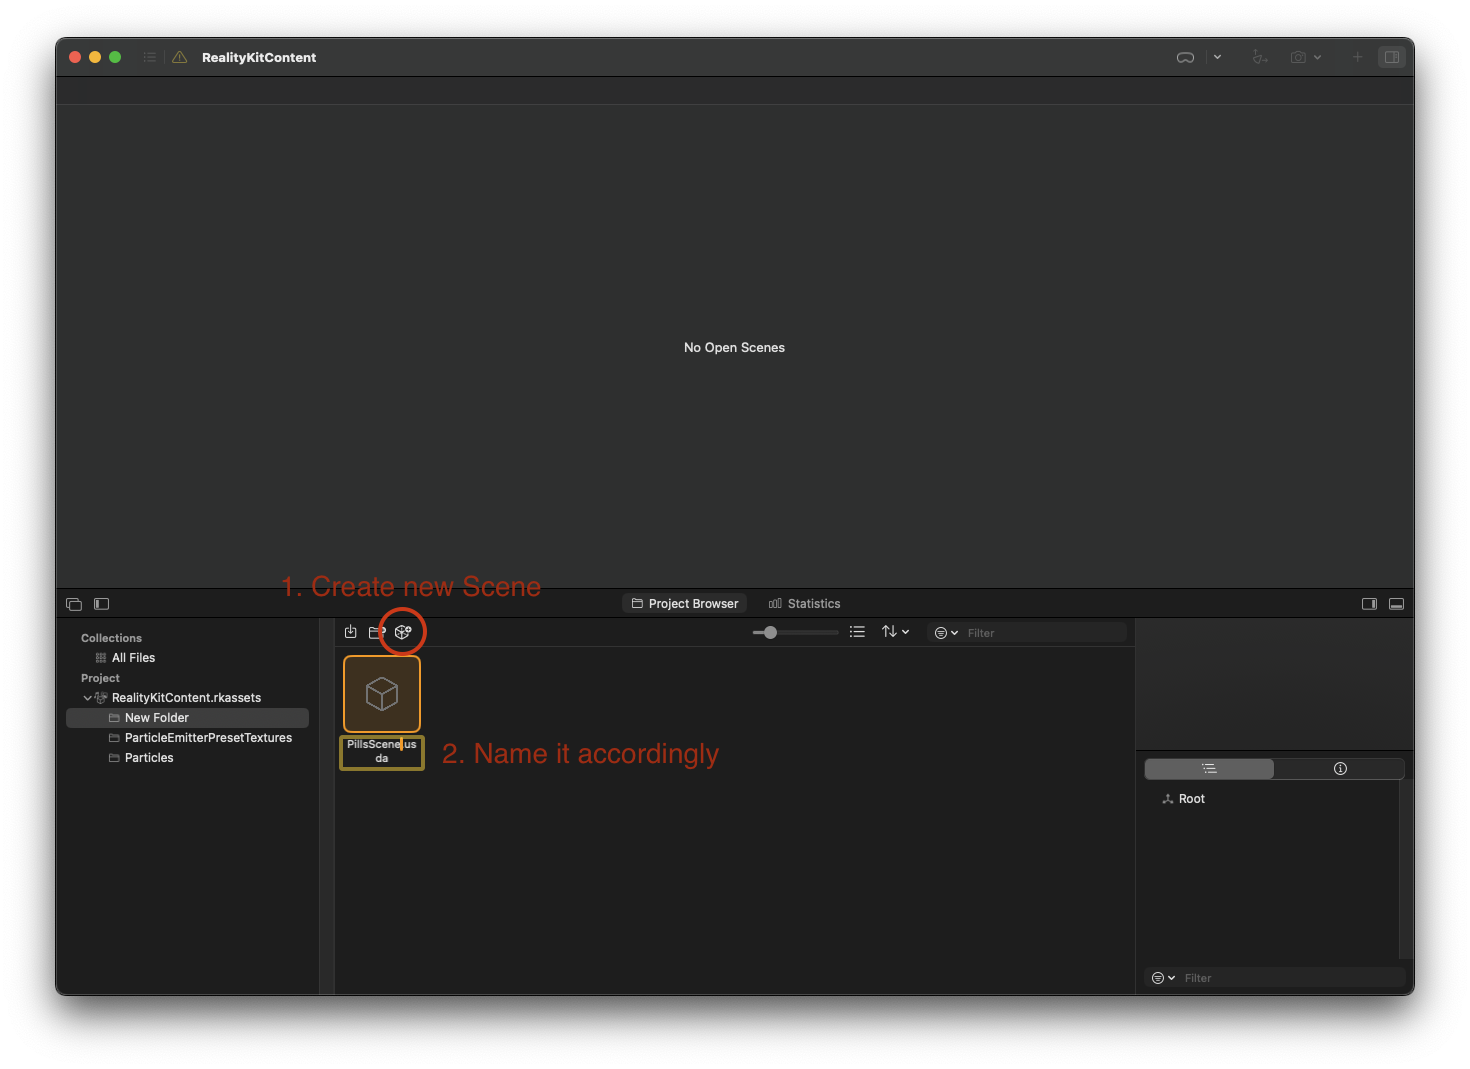
Once in Reality Composer Pro, take a minute to get familiar with the interface and the different panels. In the Project Browser at the bottom, you have a shortcut to create a new Scene, or you can hit Cmd+N as well. Let's name the new Scene "PillsScene". This name will be used later in the code to load the Scene.
Go ahead and double-click the recently created scene to open it in the editing panel. Now we are ready to add 3D content, behaviors, sounds, and anything you like to the scene. For the sake of simplicity, we will only add the two pills and position them in space.
Open the Content Library at the top right corner, and filter by the "pill" term. You will see a few results, but luckily we have already a red pill pretty similar to the ones used in the Matrix movie. Drag it to the Scene or simply double-click on it and it will automatically add it for you.

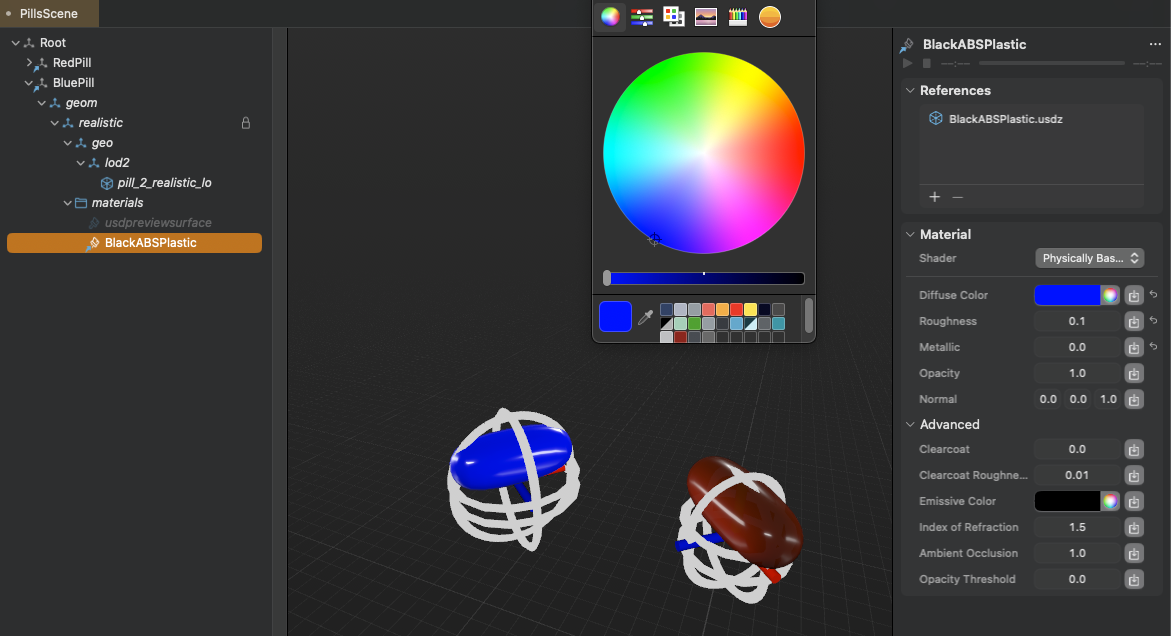
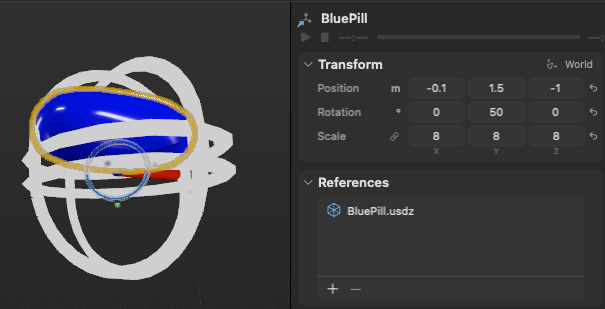
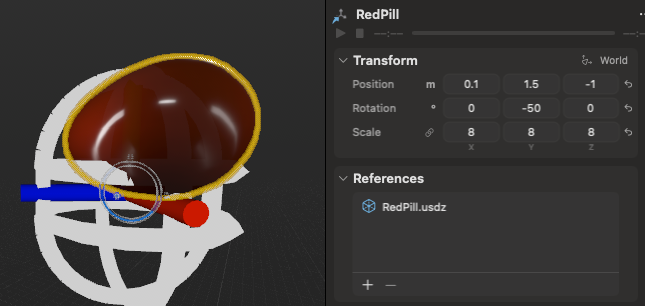
Now we need the blue pill, and with Reality Composer Pro, that's super easy. We can duplicate the same object and adjust the Material and other properties.
I added a new material(Black ABS Plastic), also available from the Content Library that matches the look of the original red pill, and then added the blue color to the material of the new pill. See the screenshot below for more details.
Perfect! We have two pills in our PillsScene, and now we can position them in space to make them look like they are in front of the user when the scene loads. Originally, all objects are added to the zero(X, Y, Z) coordinates.
In the property inspector at the right panel of Reality Composer Pro, we can adjust the position of the pills, among other things. Let's tweak the Transform properties as follows: First, we position them a bit higher, then separate them, and finally add some rotation for better visibility to the user.
In this case, we have to also adjust the scale, since the original model is quite small. Note that, by default, size measures are in meters, and angles are in degrees.
All these can be done programmatically, but we will try that later.
Second Stage: Loading content into a RealityView
It is time to load the PillsScene from the code in our PillsScreen file.
We will use a RealityView for displaying any 3D models and scenes in our applications.
Here is the complete code of the PillsScreen, let's review what is happening step by step.
CODE: https://gist.github.com/devs-rootstrap/0e8fe7636aa5ed56e55e28af2c40e779.js?file=PillsScreen.swift
- The RealityView initializer admits a building closure, that allows us to modify its content by using the closure parameter. We will use the content parameter in the following steps to build our scene.
- The addAudioSource is a helper function in a RealityViewContent extension, so we can reuse the logic of adding an audio asset to any Entity in the reality view's content. This audio resource added in this step is the introduction narrative that the user hears when landing on this screen.
- Asynchronous loads the PillsScene by using the Entity initializer that receives a name and a bundle. The important thing is that the name of the scene or object we want to load needs to match the name we assigned before in Reality Composer Pro.
- If the scene loads correctly, we add it to RealityViewContent with content.add(_ entity:).
- We add 2 more audio resources to the blue and red pills respectively. These will play once the user selects/taps a pill. This will create a better user experience, who will get instant feedback for their choice directly from Morpheus.
- We add a TapGesture recognizer for detecting when the user selects an entity. When this happens, we stop all audio coming from the introduction audio source so they don't overlap; and finally play the action associated with the selected pills entity.
- We extract the logic of each pill action to the playAction(for entity:) function. When the blue pill is selected, we play the attached audio component and dismiss the current ImmersiveSpace. On the other hand, if the red pill is taken, we do all the above and also take the user to the next stage, the MatrixSpace Immersive space, the Matrix.
All these actions will happen after some cool animations on the pills are completed. Check out the full code for more details.
This is what we have done so far, since you won't be able to hear any audio in this preview, feel free to run the project and get the full experience. 🙂
Amazing! We have a fully working mixed ImmersiveSpace with embedded 3D content, user interaction, animations, audio, and navigation.
Last Stage: Into The Matrix with VisionPro
We are now in a good place to explore more advanced topics, and The Matrix is the best place to do so.
Before, we need to add a new ImmersiveSpace to our application body.
CODE: https://gist.github.com/devs-rootstrap/6f315c52653105c327dd88699c43a2b5.js?file=TheMatrixApp.swift
The MatrixSpace will display an iconic scene from the Matrix first movie, but simple enough to implement with SwiftUI and RealityKit. The infinite white room, known as the Construct, where Morpheus introduces Neo to the Matrix loading program.
Here is the code of the MatrixSpace view:
CODE: https://gist.github.com/devs-rootstrap/42e705e3abb459d1b420a05549e524d2.js?file=MatrixSpace.swift
It is a bit more complex, so let's break it down:
- We use the AppState environment object injected to this view from TheMatrixApp body. AppState is an Observable object where we encapsulate the loading and creation of the Matrix scene. It involves various topics like Environment Resources for equirectangular images, image-based lighting sources, and creating basic entities with simple materials.
- The scene created in the AppState is added to the RealityView content. The catch here is that this object can be preloaded to improve performance, for example, during the pill selection stage.
- We now use a different initializer of RealityView, which also accepts an update closure where we can perform modifications to its content based on changing state. We dive deep into different features here:
- The Portal and World components and how they relate to each other.
- Querying the RealityView for a given Entity.
- Playing animations on an Entity.
- Fetching Attachment entities and placing them in the 3D environment.
In this scenario, the TV-set entity plays an animation, and when it ends, we simulate that the screen of the TV is the portal to the outer space. We give a hint to the user that they could look closer to the TV, by adding a SwiftUI Text on top.
- The RealityView initializer also accepts an attachments closure, where we declare the attachment views we can use in the update closure. This is done by creating a new Attachment object and providing the desired SwiftUI view to its body.
- We asynchronously create a World component that will be seen only through the Portal. The World consists of a 20-meter sphere, decorated with a star field simulating the outer space. This will create the illusion of being inside that world, similar to how we created the infinite white room before.
- An async function that creates the Portal component used in the update closure. The important piece here is that the Portal component must point to the target world component PortalComponent(target: world) and both must be children of the RealityView content.
All the assets we used are available online, or you can get them directly from our Xcode project.
Welcome to the Matrix! We have completed the three stages of our app, if you run the project it should look like this.
.gif)
That's a wrap for today's article.
While we covered a big set of features and tools, there is still plenty to explore about this new technology. Apple will continue to release exciting new features and capabilities to the VisionPro and the developer framework, so stay tuned, we will be back.
Check out The Matrix project repository: https://github.com/rootstrap/the-matrix-xr
Resources and references
We learned a lot while working on this fun demo application, and hope you continue learning too.
- VisionOS developer docs and sample apps: https://developer.apple.com/documentation/visionos
- 30 days of Vision Pro: https://github.com/satoshi0212/visionOS_30Days


