
My team and I have been working on a web application with a Django REST API as a backend. Since the system needs to authenticate the users to access almost all endpoints, we had to define how to make the login/register features.
We know that all the potential users have a Google account, so we decided to use the Google platform to take care of the authorization and then use the dj-rest-auth library to manage the session.
This way, we use Google, a platform that we know has a lot of security for the authorization, and a tested and maintained library to manage the whole flow of the session. Besides, we don't need to worry about email validation and the management of passwords.
In this article, I will discuss the defined flow and how to configure the tools to make it possible. Let's go ahead and begin, then.
Used flow
Here I'll explain the flow of the login/register process with Google in our web app. The backend is a Django (version 3.2.15) REST API in Python 3.10 that uses the Django Rest Framework (version 3.13.11), along with the dj-rest-auth library (version 2.2.5).
Besides, we have configured the user to have a unique email address, and the session is managed with JWT.
The flow is the next one:
- The Frontend (FE) user wants to log in using Google, so it selects that option.
- The user is redirected to Google and logs in with their email and password from Google.
- Google sends a code to the FE corresponding to the authenticated user.
- The FE sends the code to the Backend (BE).
- The BE uses the code to corroborate the user in Google.
- The BE creates (if it doesn't exist) the user in the database and responds to the FE with the session information.
- The FE receives that session data, and Google redirects the authenticated user to a redirect URL specified in the configuration.
- After this, the FE uses the session information to operate the BE endpoints that require authentication.
Setup the Django REST API with dj-rest-auth
I assume you already have installed and configured the dj-rest-auth library. Besides, you can read this breakdown to understand the library better.
Let's configure the library:
(1) Add allauth.socialaccount and allauth.socialaccount.providers.google apps to INSTALLED_APPS in your configuration file:
CODE: https://gist.github.com/brunomichetti/f9d14672a925f8c7036fb76a0a647d9e.js
(2) Create a new view as a subclass of dj_rest_auth.views.SocialLoginView with GoogleOAuth2Adapter adapter, an OAuth2Client and a callback_url as attributes:
CODE: https://gist.github.com/brunomichetti/1ad2f464bdf26c4be265b446b141ffe4.js
The GOOGLE_REDIRECT_URL value is the URL that you want Google to redirect the user to after a successful login.
(3) Add the view login endpoint to your urls.py configuration:
CODE: https://gist.github.com/brunomichetti/f45ef13bcc29f1700cbc031827606015.js
Note: dj-rest-auth/google/login/ can be the value you want.
(4) Since you will log in and/or register a user through Google, you don’t need email verification. You can set it in your settings file:
CODE: https://gist.github.com/brunomichetti/52375fb78c0d8da5e2bd5bfe9bfb6126.js
(5) This seems to be an error of the library: the dj-rest-auth, at some point, checks a redirect URL with the name redirect. This is a user redirect URL different from GOOGLE_REDIRECT_URL that the flow doesn’t need. So, in this case, define a Redirect view:
CODE: https://gist.github.com/brunomichetti/91f20554ef898d510b6c349754f2a12f.js
(6) Then add it to your urls.py:
CODE: https://gist.github.com/brunomichetti/581901f2c94644018986e67d4f0062e4.js
And that’s it! You have configured the REST API through the dj-rest-auth library. Now let’s go to the Google developer console to set up the project on the Google side.
Set up Google Project
In this section, we create a Google project that authenticates and redirects the user after the login.
Follow these steps:
(1) Enter in the Google Developer Console and create a project:
Create a project
(2) Set a name for it and the required data (organization, location), then click on CREATE.
(3) Go to the left side and click on “Oauth consent screen” to create one. This screen is the one used when the user clicks on the FE to log in with Google.
(4) It will ask for Internal (only for an organization) or External. Select what you need.
(5) Enter the app name, support email, and developer email. Other values are optional.
(6) Continue, and it will ask for scopes. Add it and check the boxes of email and profile:
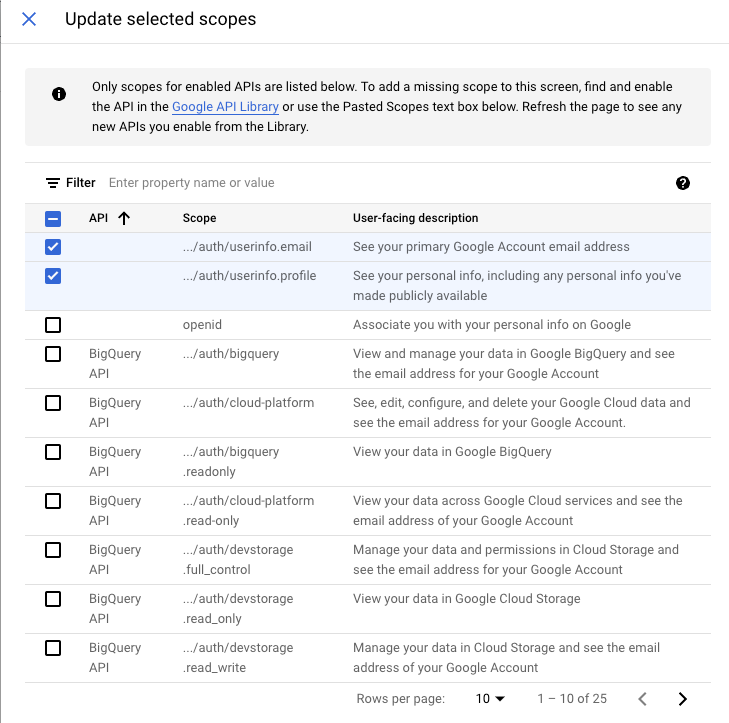
Update selected scopes
(7) Continue and go to the Dashboard. Go to the left side again and click on Credentials. Then Click on + CREATE CREDENTIALS and Create OAuth client ID.
(8) On Application, type select Web Application.
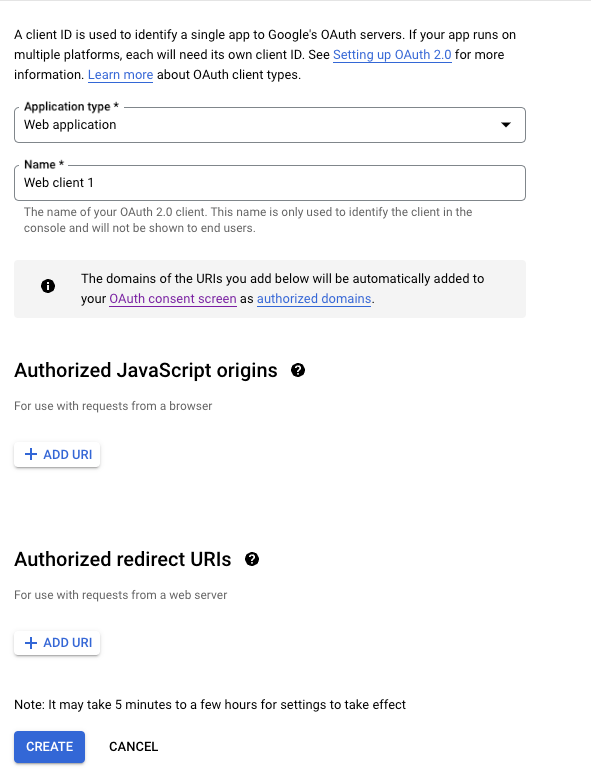
Select web application
(9) Where it says Authorized Javascript origins and Authorized redirect URLs, you need to add the URLs you want to permit in the flow. You can add more than one. For example, we added http://127.0.0.1 to test locally and the redirect URL we need to use in production.
Note: The value you set here must be exactly equal to the GOOGLE_REDIRECT_URL mentioned in the library configuration in the corresponding environment.
(10) After the creation, you will see a Client ID and a Client Secret key. Copy these values and save them in a secure place:
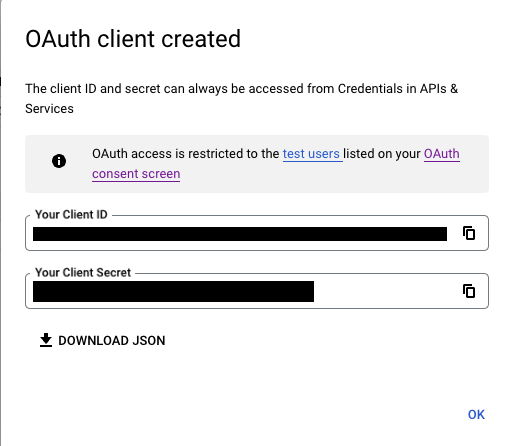
OAuth client created
Great! We are getting to the end of the whole configuration. Now let’s go back to the REST API.
Setup Social App in Django Admin
Now you need to configure a Social app in your database. The dj-rest-auth library will require this social app to communicate with Google and make sure that the user trying to log in is the correct one:
(1) Go to your Django Admin, and at the left side in Social Accounts, click + Add to create one:
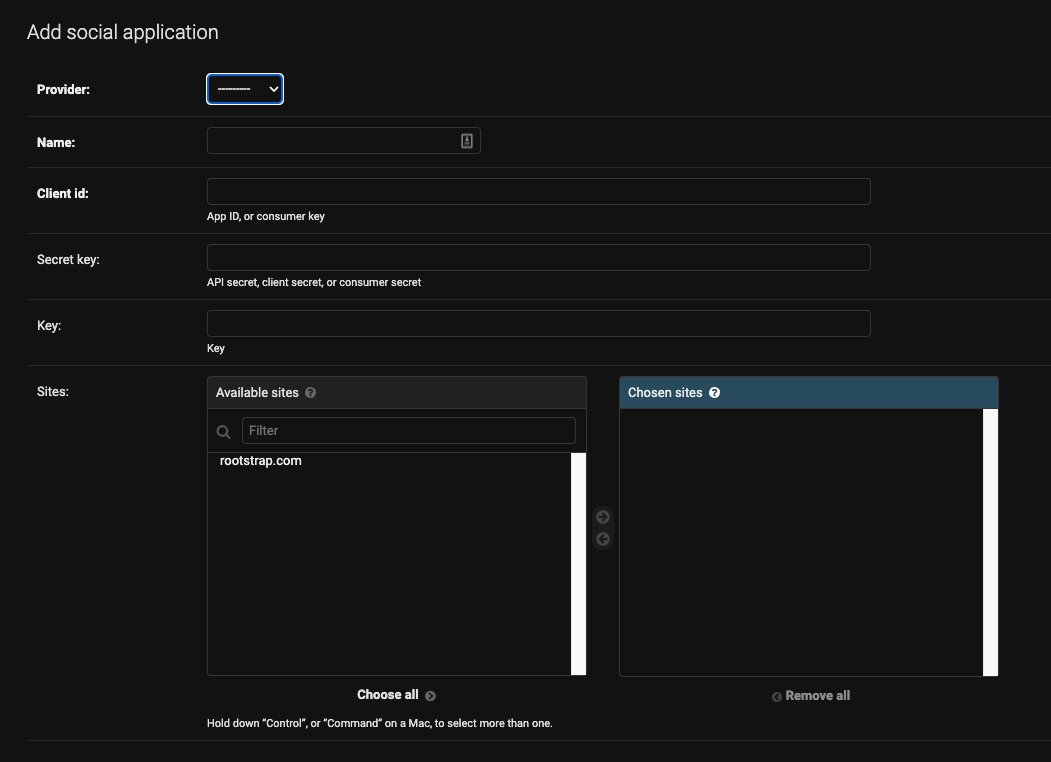
Add social application
(2) In Provider, select Google. Then in the Client id and Secret key, set the corresponding values that you obtained when configuring the project in the Google Developer Console.
(3) Select the available site and Save.
Note: If you are a developer using different environments, the best practice is to configure different Google projects and social accounts—one for each environment.
Congratulations! You have successfully configured your Django REST API to integrate the Google login. In the next sections, I’ll show you a good way to test it locally and a bonus section to customize the flow.
Test Locally
Now that we are all set let’s see the steps to ensure this is working correctly. After this section, you will be able to test this manually and locally:
(1) Define the redirect URL as the same as where you start your server: http://127.0.0.1.
(2) Set this value in GOOGLE_REDIRECT_URL mentioned in the setup of dj-rest-auth.
Add it as a redirect URI in Authorized Javascript origins and Authorized redirect URIs in your Project in the Oauth Credential in the Google Developer console.
(3) Now, in a browser, go to:
https://accounts.google.com/o/oauth2/v2/auth?redirect_uri=<CALLBACK_URL_YOU_SET_ON_GOOGLE>&prompt=consent&response_type=code&client_id=<YOUR CLIENT ID>&scope=openid%20email%20profile&access_type=offline
Changing:
- <CALLBACK_URL_YOU_SET_ON_GOOGLE> by http://127.0.0.1.
- <YOUR CLIENT ID> by the Client ID that you obtained when configuring the project of Google.
(4) This will prompt you to the Google login page. Log in with your Google email and password.
(5) After a successful login, you will be redirected in the browser to http://127.0.0.1, which obviously doesn’t show anything.
(6) Look at the URL in the browser and copy the code between code= and &scope.
(7) Since this is manual testing, you should decode that code copied from the URL. You can do it, for example, with this web tool.
(8) Start your server, and make a POST call to the endpoint that you defined in point 3 in the dj-rest-auth setup section. The body of the POST must have a key called code with the decoded code as a value.
(9) The endpoint will create a user with your information and login with the user returning the session data.
(10) To test it again, repeat it from step 3, and Google will generate a new code.
If everything goes well, you’ll have created a user in your local database with your email from Google, and the response will contain the session data.
Bonus: Validate User on Google login
If you want to make some validations when logging in user with Google, I’ll show you examples in this section. Let’s imagine you want to allow the user to log in only if he is a superuser. You want to return an error with a message if it isn't.
Follow these steps:
(1) Create a custom adapter that is a subclass of GoogleOAuth2Adapter
(2) Overwrite the function complete_login that returns a login object. This object has the user attribute that corresponds to the already authorized user by Google.
(3) In this function, call the complete_login function by the parent class with super.
(4) Customize the access as you need and return the login object.
(5) The example would be the following:
CODE: https://gist.github.com/brunomichetti/007c822fe04722349dfef9133df17cf1.js
(6) Then go to the created view and set this new custom adapter:
CODE: https://gist.github.com/brunomichetti/3f7e34adb2b98db2643f3414aaf87cc6.js
And that’s it! This way, even after the user has logged in correctly in Google, your REST API won’t be able to log in if it isn’t an existent superuser.
The Frontend Tasks
The main purpose of this article is to explain the integration in Django. In our case, the frontend (FE) is a React JS web app, but it can be any other framework that fits the current reality.
What does the FE need to do?
It needs to add a button to go to the Google login somewhere on the web page and may use a library to integrate that with Google. For sure, it will need to know the Client id and Redirect URLs named in the configuration.
Also, so that you know, you need to add the FE URLs in the Google developer console in the Authorized Javascript origins and Authorized redirect URIs inputs. In our FE, the used library is React OAuth 2 for Google.
The Takeaway
This breakdown showed how to integrate the Google login with a Django REST API using the dj-rest-auth library. I discussed the defined flow, tools, and examples to customize the login/registration.
I mentioned good practices and tips to make this possible, considering that the readers want to incorporate this in the project they are working on. I hope you enjoyed the reading, and feel free to comment and ask any questions you may have.
Don’t hesitate to reach out if you have any problems trying to reproduce the content or have any suggestions to improve the described feature. We are here to help!


